Pellet Grill Pulled Pork
November 17, 2024
What You’ll Need
Ingredients
1 pork shoulder (a.k.a. Boston Butt)
Approx. 1/4 cup yellow mustard
BBQ Rub of your choice (see below for recommendations)
Optional Ingredients
Rolls or buns to serve it on
Sauce to serve on the side
Recommended Tools
In order to precisely cook the pork to the desired temperature, it’s important that you have a meat thermometer. Also, a pellet grill would be good!
Recipe
- Calculate how long your pork shoulder will need to cook for, and ensure you will have enough time to cook it prior to starting. For every pound of meat, you should expect to smoke it for about 2 hours. The pork shoulder in my photos is about 4.5 lbs, and it took roughly 9 hours to cook thoroughly.
- 30 minutes prior to when you need to start smoking the meat, take the meat out of the refrigerator, and start preheating your grill to 225 °F.
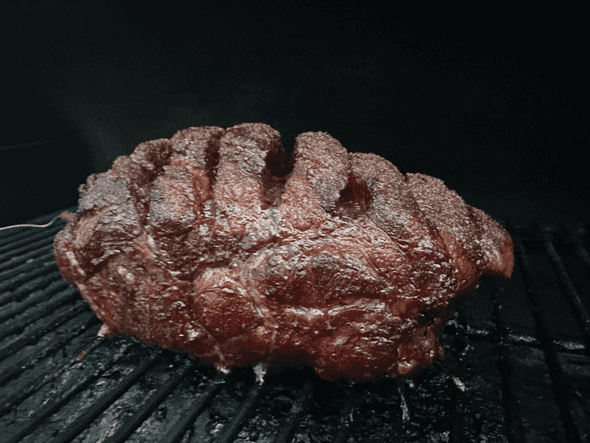
- Place your pork shoulder on a cutting board, with the fat cap side face-up. Use a paper towel to dry off the surface of the meat, then score the fat cap.
- The best way that I’ve found to do this is to cut in only one direction (not a checkerboard style), 1 inches apart, and deep enough where your cuts are getting through where the fat cap meets the lean.
- Rub the mustard into the pork shoulder, creating a thin layer of binder all around the meat, being sure to rub mustard in between the cuts. Then, generously sprinkle your choice of BBQ rub onto the pork shoulder, covering all sides of the meat.
- Insert a meat thermometer into the middle of the pork shoulder.
- Allow the meat to sit on the cutting board for 15-20 minutes while the smoker is preheating (this will allow the meat to warm up a little bit and for the seasoning to bind to the meat)
- Once the grill is preheated to 225 °F, transfer the pork shoulder to the center of the bottom rack of your grill, with the fat cap of the shoulder facing up.
- Smoke the shoulder for approximately 2 hours for every 1 lb of pork, or until the pork reaches an internal temperature of 195 °F.
- Remove the pork shoulder from the grill, and transfer it to some kind of dish with walls, like a glass baking dish or a disposable aluminum dish. Let it sit in the oven or microwave to rest for about 10 minutes.
- Shred the pork with a couple of forks inside of the dish it’s currently sitting in and enjoy!
Easy, Simple, Delicious
For Father’s Day a few years ago, I was able to get my first pellet grill, and one of the very first things I ever smoked on it was a pork shoulder! It’s one of my favorite things to make on a pellet smoker, because it’s a good beginner recipe for those who are new to smoking meat, and it tastes great.
If you follow the above recipe, you should be able to make a delicious dinner for several people, and I also have a few other tips that can help you on your journey to making some of the best meals of your life:
“Look at me! I’m about to touch the buuuuutt!”
Sorry, but I love that movie. Anyway, when you’re going to the store to pick out your cut, you’re going to want for specific cuts of pork. The cut you’re looking for goes by a couple of different names, the two main ones I’ve seen are a pork shoulder or a Boston butt. They are essentially pork roasts with the fat cap still on.
Picking out a pork shoulder with a decent fat cap is one of the keys to success. A common phrase used by many pitmasters across America is “fat is flavor”, which makes plenty of sense: it’s common to put butter on things like steaks to enhance the flavor of leaner cuts of meat, or to wrap brisket in butcher paper and beef tallow after it reaches a certain point in the cook. Sometimes what folks might do when they’re cooking a pork shoulder is towards the end of the cook (maybe about an hour or two before the shoulder is done) they will add butter and brown sugar to the meat, place it in a metal container and cover it with tin foil to be able to lock in moisture and reduce the amount of flavor lost from the butter or rendered fat dropping into the bottom of the grill.
Why didn’t my recipe include that as a step? Well… One of the other things I don’t typically like to do anymore is trim the fat cap of my pork shoulder. I used to, but I realized I was either cutting away too much fat, or that my pulled pork wasn’t as flavorful with that fat missing.
The other thing you want to be wary of is how large your cut is, how long it will take to cook, and how many people you’re looking to feed. Typically, I will pick out a 4.5 lb pork shoulder. If I have that cut on the grill and cooking starting at 8 a.m., after about 9 hours of smoking, 15 minutes of rest time, and a few more minutes of shredding, I can easily have it ready to eat by 5:30 p.m.
If you think each person you’re cooking for could eat half a pound of meat, that’s 9 people you could feed without leftovers. My wife and I end up getting plenty of leftovers out of this dish since it’s usually us and maybe a couple other people who eat with us.
It’s All in the Preparation
Once you’ve got your cut of meat, you actually need to prepare it! I’m now very particular about how I prepare my pork shoulder, and it’s through trial and error… Well… Maybe not error as much as experimentation until I find what I like best.
To Score, or Not to Score
Do you have to score the fat cap of your pork shoulder? Absolutely not. Do I heavily heavily recommend you do? Yes, and I have a particular way I like to do it and I have my reasons for doing so:
The best way that I’ve found to do this is to cut in only one direction (not a checkerboard style), 1 inches apart, and deep enough where your cuts are getting through where the fat cap meets the lean.
How did I arrive at the conclusion that this was the best scoring method? Like I said, I have experimented many times with different scoring methods, including not scoring at all. Here are my findings:
- No scoring: the meat towards the top of the fat cap is not as flavorful due to a lack of smoke penetrating that part of the meat, though the pork shoulder is quite moist.
- Bi-directional (checkerboard-pattern) scoring: the meat towards the top of the fat cap has more smoke flavor, though the meat is a little less moist.
Scoring the meat in one direction at an angle (around 45 degrees, doesn’t have to be perfect) has never failed me, and has produced the best tasting pulled pork.
The Condiments That Bind
While smoke provides the greatest amount of flavor to your pork, there’s also another major factor that can change the flavor profile, and that’s how you season the meat. I’ve tried a few different barbeque rubs, and I have really grown to enjoy Meat Mitch WHOMP! Rub, Meat Church Honey Hog, and there is a local barbeque place in Kansas City called Jack Stack that sells an all-purpose meat and poultry rub that tastes great.
The best part about picking a rub is how much it can change your cook: Meat Church Honey Hog is a much sweeter rub, while something like Meat Mitch or Jack Stack would be much more savory. In combination with the smoke from whatever your pellets of choice are, the flavor profile of your cook can change.
Before applying any seasoning, however, it’s important to apply a binder so that you don’t lose any of the seasoning prior to putting the meat into the smoker. For the purpose of this cook, I used mustard. It’s perfectly ok to use mustard for this, or you can use something like mayo. Mustard is not normally a condiment I would put on anything because I just… Don’t like it at all, but what I can tell you is that if you don’t like mustard, don’t be afraid to use it as a binder. I can’t taste any mustard once everything is said and done.
I’ve also seen online where people will use things like sriracha as a binder too, but I can’t guarantee whether or not that will change the flavor of your cook. Mustard and mayonnaise typically don’t have a very strong taste, but something like sriracha absolutely does. Maybe I’ll try it one day, who knows.
Sitting and Waiting and Sitting…
One thing you can be sure about during this cook is that there will be a lot of downtime, but at each stage of the game, it’s very important to allow time to pass:
- Before putting the meat into the smoker and after applying bindings and seasonings, it’s a good idea to allow your meat to “sweat” in order to allow the seasonings and bindings to stick to the meat.
- During the cook, it’s important to just allow the pork shoulder to sit in the smoker and not fuss with it too much. Some people like to spray apple cider or something onto their pork shoulder
every couple of hours, but I have found in doing this that it doesn’t really affect things much.
- I used to shred my pork shoulders immediately after pulling it off the grill, and I would shred it on a cutting board. After allowing the shoulder to sit in the microwave for a few minutes in a pan and shredding it while it’s already in a pan, I’ve found that this prevents a loss of moisture that would otherwise just be all over the cutting board and countertop.
The downtime, however, is also what makes this recipe so easy: the majority of your time is just spent monitoring the temperature of the pork shoulder. You don’t even need to open the lid of the smoker for hours (unless you want to take pictures).
Serving Up Deliciousness
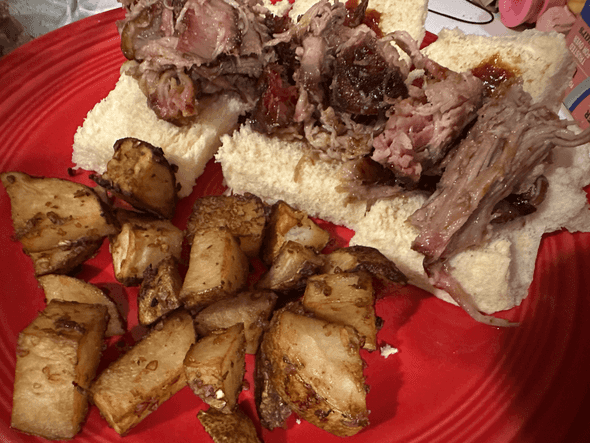
At this point the world is your oyster: you’ve got some perfectly cooked pulled pork in front of you, and all that’s left is to serve it up! My favorite way is to just slap it on top of some Hawaiian Rolls with some BBQ sauce and eat it like sliders, with some baked beans and some kind of potato dish as a side. Pictured above is some french onion soup roasted potatoes, which is a really easy side dish to make, and only takes 3 ingredients to make (that’s worth a post itself). You can also serve it on a bun of your choice, or if you’re gluten-intolerant just by itself and eating it with a fork.
Usually this recipe will yield quite a bit of leftovers, and there’s even more that you can do with any leftover pork that you have: you can either serve it the same way you ate it initially, or if you’re feeling adventurous you can reheat it in a pan with some taco seasoning and make carnitas with it!
Conclusion
I hope you enjoyed this post! This is the first of many recipe posts that I hope to make in the future, and if you did try this yourself, let me know how it went!

